
How I Made AI My Substack Publishing Assistant (Complete Setup)
How I Made Claude Desktop Open, Send Messages, and Execute Tasks Automatically at Scheduled Times

You've got MCP working and tested the basic connection.
Now comes the exciting part - building something that actually runs itself. What comes next transforms your simple test into a complete automation system. We're adding content management, removing manual triggers, and building a workflow that runs independently.
By the end of this article, you'll have automated Substack Notes publishing that runs on schedule without any manual work.
Ready? Let's begin.
Phase 4: Adding Database Integration with Notion
In an earlier article, I showed you how to update Notion databases from ChatGPT conversations using ActionGPT. That method worked, but required significant technical setup.
With MCP, this becomes dramatically simpler.
The same result with much less technical complexity.
Here's exactly how to add database integration to your MCP workflow. This phase has two main steps that eliminate all the technical headaches from my previous approach.
Step 1: Setting Up Your Notion Database
Create a new database in Notion with this simple structure:
Database Name: "Substack Notes Queue"
Essential Columns:
Notes Content (Text): Your actual Substack Notes content
Status (Select): Options include "Ready," "Posted," "Draft"
Date Added (Created time): Automatic timestamp when content is added
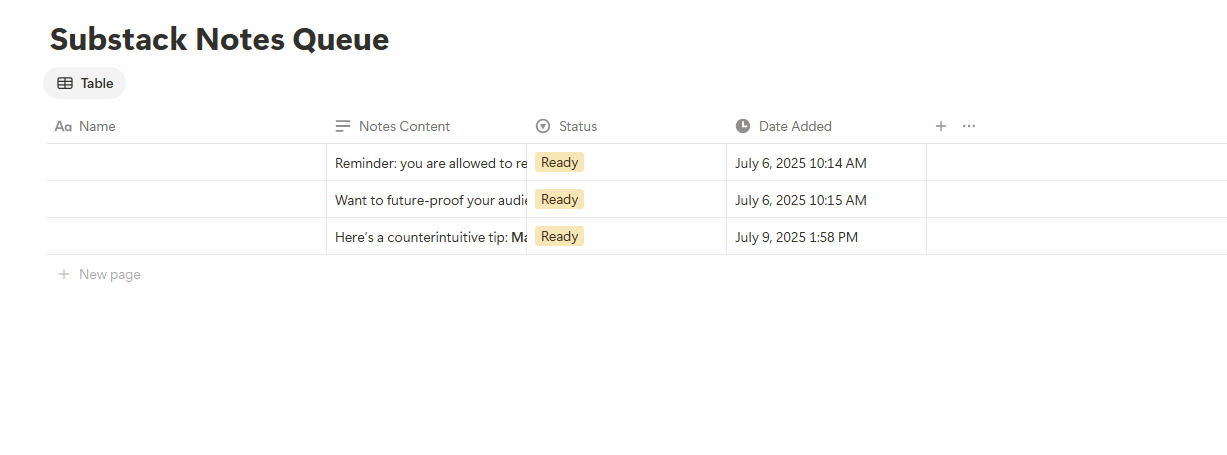
This structure gives you everything needed for automated publishing. Content goes in, status tracks progress, and timestamps keep your queue organized.
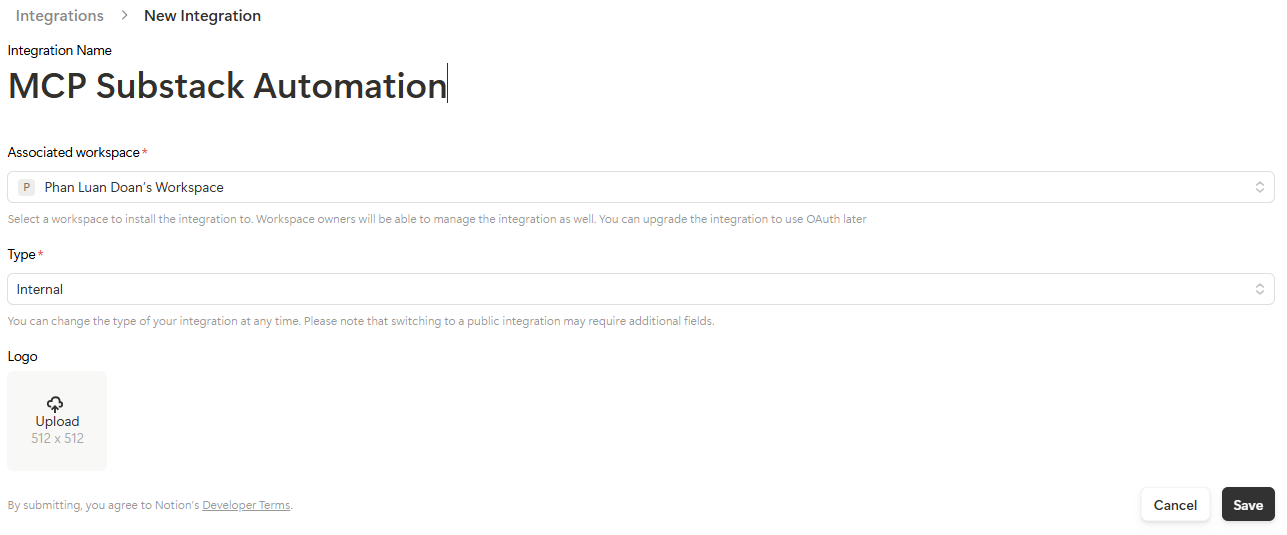
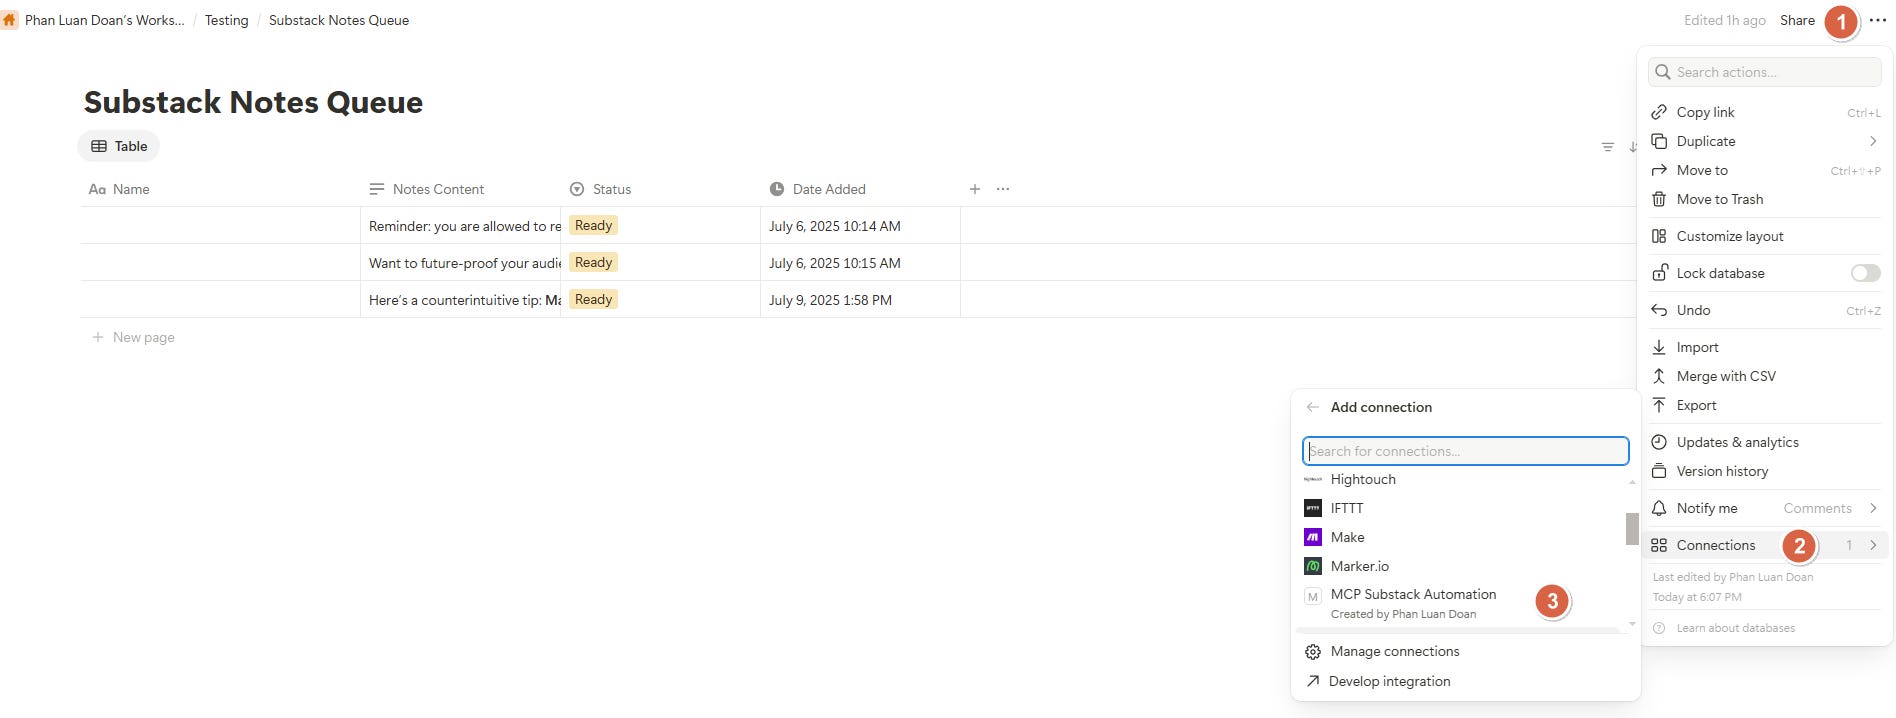
Setting Up the Integration:
Go to your Notion integrations page: https://www.notion.so/profile/integrations
Create new integration called "MCP Substack Automation"

Copy the integration token (you'll need this for MCP setup)
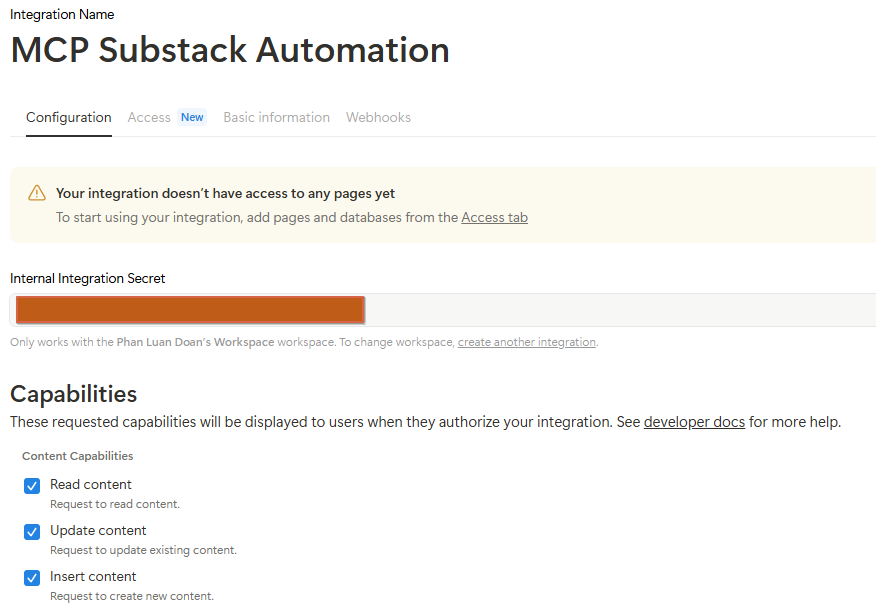
Connect the integration to your new database

The database becomes your content pipeline. Claude can read what's ready to post and automatically update the status when publishing completes.
Step 2: Connecting Claude Desktop to Notion
Here's where MCP eliminates the complexity from my previous method.
MCP Server Configuration:
Open Claude Desktop settings
Add Notion MCP server to your configuration
"notionApi": {
      "command": "npx",
      "args": [
        "-y",
        "@notionhq/notion-mcp-server"
      ],
      "env": {
        "OPENAPI_MCP_HEADERS": "{\"Authorization\": \"Bearer [integration token]\", \"Notion-Version\": \"2022-06-28\" }"
      }
    }
Paste your integration token from Step 1: replace with this [integration token]
Save and restart Claude Desktop
That's it. No complex API documentation to navigate. MCP handles the technical integration automatically.
The same database connection that required technical setup before now works much more simply.
Your final Claude settings JSON looks like this:
{
  "mcpServers": {
    "browsermcp": {
      "command": "npx",
      "args": [
        "@browsermcp/mcp@latest"
      ]
    },
    "notionApi": {
      "command": "npx",
      "args": [
        "-y",
        "@notionhq/notion-mcp-server"
      ],
      "env": {
        "OPENAPI_MCP_HEADERS": "{\"Authorization\": \"Bearer [integration token]\", \"Notion-Version\": \"2022-06-28\" }"
      }
    }
  }
}
Testing Your Database Connection
Let's test this connection with real data to prove everything works correctly.
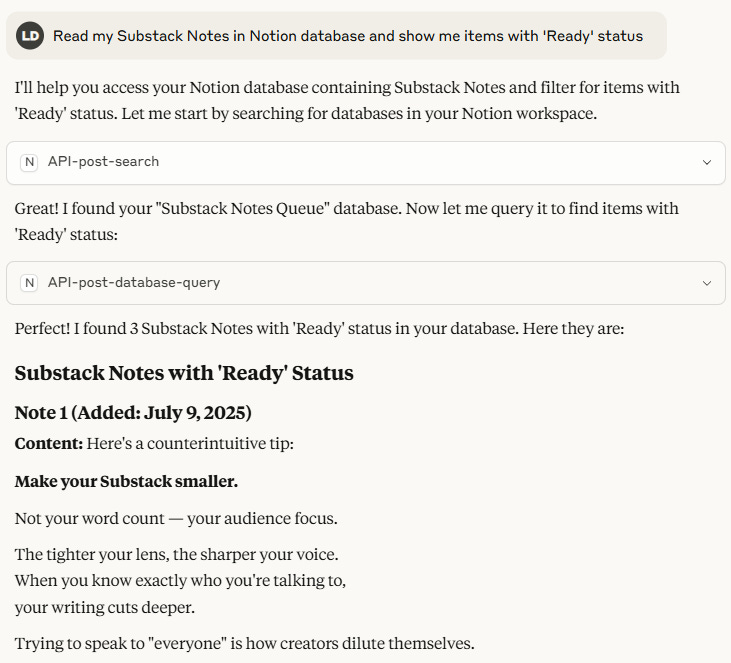
Demo Commands:
"Read my Substack Notes from Notion database and show me items with 'Ready' status"
"Take the first ready item and change its status to 'Posted'"
"Add a new test note with 'Ready' status"
Ready for the final automation step? Phase 5 removes even the manual trigger, letting your system run completely independently.
Phase 5: Making It Truly Automatic with Windows Task Scheduler
This is the final automation step that removes even the manual trigger.
No more remembering to run your system. No more opening Claude Desktop yourself. Your Substack Notes publishing happens completely independently.
For this demo, I'm using Windows Task Scheduler. Mac users can achieve similar results with Shortcuts app, though the setup differs slightly.
Here's exactly how to make your system run hands-off.
The PowerShell Script That Runs Everything
The automation centers around a PowerShell script that handles your entire workflow sequence.
What this script accomplishes:
Opens Claude Desktop automatically
Starts a new chat session
Sends your predefined prompt to trigger the workflow
Opens Opera browser for Substack access
Publishes your Notes through the MCP browser integration
The script follows the exact same steps you'd do manually, but executes them automatically at whatever schedule you set.
Customizing Your Automation Settings
The script includes a simple setup for your prompt message.
File Path Setup: Edit the file path in the script to match your system. Change this line to your preferred location: $MessageFilePath = "C:\Users\YourName\YourFolder\message.txt"
Creating Your Prompt File: I'll provide a ready-to-use message.txt file with the Substack posting prompt. You can modify the prompt in message.txt if needed to match your specific requirements.
The Automation Files:
PowerShell Script:
# Claude Desktop to Opera Browser Automation Script
Write-Host "Starting Claude Desktop to Opera automation..." -ForegroundColor Green

# Configuration: Message file path (edit this path as needed)
$MessageFilePath = "C:\Users\YourName\YourFolder\message.txt"

# Check if Win32 type already exists and remove it
if ([System.Management.Automation.PSTypeName]'Win32Opera'.Type) {
    Remove-TypeData -TypeName Win32Opera -ErrorAction SilentlyContinue
}

# Define the Win32 type for window management
Add-Type -TypeDefinition @"
using System;
using System.Runtime.InteropServices;
public class Win32Opera {
    [DllImport("user32.dll")]
    public static extern bool SetForegroundWindow(IntPtr hWnd);
    [DllImport("user32.dll")]
    public static extern bool ShowWindow(IntPtr hWnd, int nCmdShow);
    [DllImport("user32.dll")]
    public static extern bool IsIconic(IntPtr hWnd);
    [DllImport("user32.dll")]
    public static extern bool IsZoomed(IntPtr hWnd);
}
"@

# Function to find process by executable name
function Find-ProcessByName {
    param([string]$ProcessName)

    # Remove .exe extension if provided, then add it back for consistency
    $cleanName = $ProcessName -replace '\.exe$', ''

    $processes = Get-Process | Where-Object {
        $_.ProcessName -eq $cleanName -and
        $_.MainWindowHandle -ne [IntPtr]::Zero
    }

    if ($processes.Count -gt 0) {
        Write-Host "Found process: $($processes[0].ProcessName) (PID: $($processes[0].Id))" -ForegroundColor Cyan
        if ($processes[0].Path) {
            Write-Host "Process location: $($processes[0].Path)" -ForegroundColor Cyan
        }
        return $processes[0]
    }
    return $null
}

# Function to bring window to foreground and maximize using Windows API
function Maximize-Window {
    param($Process, $ProcessName)

    if ($Process -and $Process.MainWindowHandle -ne [IntPtr]::Zero) {
        try {
            $hwnd = $Process.MainWindowHandle

            Write-Host "Bringing $ProcessName to foreground and maximizing..." -ForegroundColor Yellow

            # Check if window is minimized
            $isMinimized = [Win32Opera]::IsIconic($hwnd)

            if ($isMinimized) {
                # Restore from minimized state first
                [Win32Opera]::ShowWindow($hwnd, 9)  # SW_RESTORE
                Write-Host "$ProcessName restored from minimized state" -ForegroundColor Cyan
                Start-Sleep -Milliseconds 100  # Small delay to ensure restoration
            }

            # Maximize the window
            [Win32Opera]::ShowWindow($hwnd, 3)  # SW_MAXIMIZE
            Write-Host "$ProcessName maximized" -ForegroundColor Cyan

            # Bring to front
            [Win32Opera]::SetForegroundWindow($hwnd)
            Write-Host "$ProcessName brought to front" -ForegroundColor Cyan

            Write-Host "$ProcessName is now maximized and in focus" -ForegroundColor Green
            return $true
        }
        catch {
            Write-Host "Error bringing $ProcessName to front: $_" -ForegroundColor Red
            return $false
        }
    } else {
        Write-Host "Invalid process or window handle for $ProcessName" -ForegroundColor Red
        return $false
    }
}

# Main script execution
try {
    # Load required assemblies
    Add-Type -AssemblyName System.Windows.Forms

    # Read message from file
    Write-Host "Reading message from file: $MessageFilePath" -ForegroundColor Cyan

    if (-not (Test-Path $MessageFilePath)) {
        throw "Message file not found: $MessageFilePath. Please create the file and add your message."
    }

    try {
        $messageContent = Get-Content -Path $MessageFilePath -Raw -Encoding UTF8
        if ([string]::IsNullOrWhiteSpace($messageContent)) {
            throw "Message file is empty: $MessageFilePath. Please add your message to the file."
        }
        # Remove any trailing whitespace/newlines
        $messageContent = $messageContent.Trim()
        Write-Host "Message loaded successfully: '$messageContent'" -ForegroundColor Green
    }
    catch {
        throw "Failed to read message file: $_"
    }

    # Step 1: Find Claude Desktop (assuming it's already running)
    Write-Host "Step 1: Looking for Claude Desktop process..."

    $foundClaude = Find-ProcessByName -ProcessName "claude.exe"

    if (-not $foundClaude) {
        throw "Claude Desktop process (claude.exe) not found. Please make sure Claude Desktop is running."
    }

    Write-Host "Claude Desktop found!" -ForegroundColor Green

    # Step 2: Bring Claude to foreground and maximize
    Write-Host "Step 2: Bringing Claude to foreground and maximizing..."
    if (-not (Maximize-Window -Process $foundClaude -ProcessName "Claude Desktop")) {
        throw "Failed to maximize Claude window"
    }
    Write-Host "Waiting 5 seconds after bringing Claude to front..."
    Start-Sleep -Seconds 5

    # Step 3: Send Ctrl+N to start new chat
    Write-Host "Step 3: Starting new chat with Ctrl+N..."
    [System.Windows.Forms.SendKeys]::SendWait("^n")
    Write-Host "Waiting 3 seconds after Ctrl+N (start new chat)..."
    Start-Sleep -Seconds 3

    # Step 4: Wait 3 seconds to load
    Write-Host "Step 4: Waiting 3 seconds for new chat to load..."
    Start-Sleep -Seconds 3

    # Step 5: Type the message using clipboard
    Write-Host "Step 5: Copying message to clipboard and pasting..."

    # Copy message to clipboard
    Set-Clipboard -Value $messageContent
    Write-Host "Message copied to clipboard" -ForegroundColor Cyan

    # Paste using Ctrl+V
    [System.Windows.Forms.SendKeys]::SendWait("^v")
    Write-Host "Message pasted from clipboard" -ForegroundColor Cyan

    Write-Host "Waiting 3 seconds after typing message..."
    Start-Sleep -Seconds 3

    # Step 6: Send Ctrl+Enter to send message
    Write-Host "Step 6: Sending message with Ctrl+Enter..."
    [System.Windows.Forms.SendKeys]::SendWait("^{ENTER}")

    # Step 7: Wait 3 seconds
    Write-Host "Step 7: Waiting 3 seconds..."
    Start-Sleep -Seconds 3

    # Step 8: Bring Opera browser to foreground and maximize
    Write-Host "Step 8: Looking for Opera browser..."
    $operaProcess = Find-ProcessByName -ProcessName "opera.exe"

    if (-not $operaProcess) {
        throw "Opera browser not found. Please make sure Opera is running."
    }

    Write-Host "Opera process found: $($operaProcess.ProcessName)" -ForegroundColor Green
    Write-Host "Bringing Opera to foreground and maximizing..."

    if (-not (Maximize-Window -Process $operaProcess -ProcessName "Opera Browser")) {
        Write-Host "Warning: Failed to maximize Opera window" -ForegroundColor Yellow
    }

    # Step 9: Finish
    Write-Host "Step 9: Automation completed successfully!" -ForegroundColor Green

} catch {
    Write-Host "Error: $_" -ForegroundColor Red
    Write-Host "Script failed to complete." -ForegroundColor Red
} finally {
    Write-Host "Script finished." -ForegroundColor Cyan
}
Message File:
Help me publish a Substack Note from my Notion database. Use MCP tools to:
1. Get a note from Notion
   * Find one note in "Substack Notes Queue" database where State = 'Ready'
   * Get Notes Content
2. Create Substack Note (use BrowserMCP)
   * Go to substack.com
   * Create a new note on Substack with content from Notion

3. Update Notion
   * Change that note's Status to 'Published' after published
Important
* Only work with one note at a time
* Use whatever MCP tools are available to accomplish this
You can download both files here:
Once you have both files, edit the file path in the script to match your system location, then proceed to Task Scheduler setup.
Setting Up Windows Task Scheduler
Step-by-Step Setup:
Open Task Scheduler from Windows Start menu

Click "Create Basic Task" in the right panel
Name your task "Substack Notes Automation" and click Next
Choose your timing (daily, weekly, specific times) and click Next
Select "Start a program" as the action and click Next
Program/Script: Type
powershell.exeAdd arguments:
-ExecutionPolicy Bypass -WindowStyle Hidden -File "[path to script]"(Change[path to script]to your actual script file path)Click Next, then Finish
Test the task to confirm everything works: right click on Task → Run

Multiple Daily Posts: Want to post 3 times per day? Create 3 separate daily schedules - one for morning, afternoon, and evening. Each task uses the same script but runs at different times.
Your automation system is now complete and scheduled. Time to see it in action.
Phase 6: The Complete Workflow in Action
This is it. The moment where everything comes together.
You've built the database, configured MCP, created the automation script, and scheduled the tasks. Now let's watch your complete hands-off publishing system work its magic.
Setting the Stage for Success
Before we run the demonstration, make sure these essentials are ready:
Keep These Applications Running:
Claude Desktop: Always open and ready for new conversations
Opera browser (or your chosen Chromium browser with BrowserMCP installed): Always running for Substack publishing. Make sure to connect the tab in BrowserMCP by clicking the "Connect" button
Computer Configuration:
Prevent sleep mode: Change your power settings so the computer stays awake during scheduled times
Stable internet connection: Ensures smooth communication between all components
These simple prerequisites ensure your automation runs smoothly without interruptions.
The Complete System Demonstration
Here's what happens: Task Scheduler triggers the script at the exact scheduled time. Claude Desktop opens a new conversation, reads your Notion database, identifies content marked as "Ready," publishes it to Substack Notes, and updates the database status to "Posted."
Your complete automation system is now live and working. Content flows seamlessly from your Notion database to published Substack posts without any manual intervention.
Your Turn
MCP servers transform AI from conversation tool to action-taking assistant. Instead of just discussing what needs to be done, your AI actually does the work.
With MCP, AI becomes the central hub of your daily work. Your AI connects directly to all your tools, databases, and systems. Instead of switching between separate applications, everything flows through your AI as the central command center.
This positions AI as the core of your work ecosystem. Your tools and data sources connect to AI, creating a unified system where everything works together through one intelligent center.
Stop limiting AI to conversations. Start exploring MCP servers for your workflows. Turn your AI from advisor into employee.
The technology exists. Your move.
My method is simple, I write and ask my friend AI to help make it more clear
Thanks for the tips, can’t wait to try this!